Paradise
Paradise
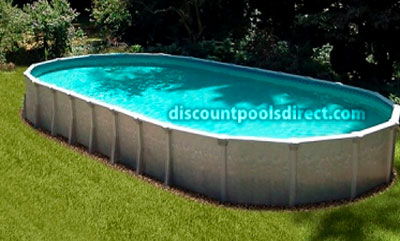
The Paradise pool combines steel and resin pieces along with a one-piece aluminum wall to create an amazing pool, at a price, families can afford. The manufacturer uses Krystal Kote, anti-corrosion sealant, on the components of the pool to allow for durability. It is assembled with a steel frame to support the aluminum wall and is finished with high end resin pieces to blend the tan tones together and create a pool, families will enjoy together for years to come.
- Wall Height: 52" Wall height
- Top Seats: 8" Resin Top Seat
- Uprights: 6" Steel Coated Uprights
- Wall:Aluminum Wall
- Liner:30 mil Unibead Pacific Diamond or Mystri Gold Liner
- Install:Narrow Yard Oval Install
- Track:Steel Bottom Track
- Warranty:60 Years Manufacturers Warranty - 3 years full warranty
Paradise
| Round Pools | |||
| Pool Size | Pool Pricing | ||
|---|---|---|---|
| 12' Round |
$1,429.00 |
||
| 15' Round |
$1,599.00 |
||
| 18' Round |
$1,699.00 |
||
| 21' Round |
$1,899.00 |
||
| 24' Round |
$1,999.00 |
||
| 27' Round |
$2,199.00 |
||
| 30' Round |
$2,349.00 |
||
| 33' Round |
$2,749.00 |
||
| Oval Pools | |||
| 12' X 17' Ovals |
$2,349.00 |
||
| 12' X 24' Ovals |
$2,649.00 |
||
| 15' X 26' Ovals |
$2,749.00 |
||
| 15' X 30' Ovals |
$2,949.00 |
||
| 18' X 33' Ovals |
$3,249.00 |
||
| 18' X 40' Ovals |
$3,599.00 |
||
| 21' X 43' Ovals |
$4,349.00 |
| Second Set of Features |
| One piece Aluminum Wall |
| Weather Resistant Polyester Base Paint plus Clear Krystal Kote on outside of wall - locks out corrosion, discoloration and dirt |
| Liquilock Epoxy Wall Backer on inside of wall to prevent condensation buildup |
| 52" Wall Height |
| 8" wide injection molded Resin Top Seat |
| 7" Multi-faceted Steel Uprights |
| Sculpted Two-Piece injection molded high impact Resin Caps |
| Interlocking Steel Stabilizer bars |
| Heavy Duty 1" Steel Bottom Track |
| One-Piece injection molded Resin Boots for easy set |
| Pool wall and frame is a tan/taupe color |
| 60 year manufacturers warranty with three-year full warranty |
| Available in Round and Oval Sizes |
| All Paradise pools require a minimum of one foot clearance around pool |
| Oval Pools have Yardmore/Narrow Yard space saving design require 18" clearance on sides |
| All prices include shipping |
| Installation not included |
| Made in the USA |
A week to 10 days before beginning installation you need to verify you have all your parts. All pool boxes should be opened and compared to the packing list to verify nothing is missing or damaged. Parts list are included on the CD in your pool box, the packing list within each box and are listed in this section.
You can contact an installer in your area or install the pool yourself. However, if you are considering installing the pool yourself, please review both the manual instructions and installation video in this section. We do not offer installation or installation advice, you are purchasing the kit only.
You can connect all the hoses and unions that come with your system (seen below) or you can hard plumb the system (in the next section).
To hard plumb your pump and filter system you will need to purchase some items from a local hardware store:
- PVC pipe
- Elbow joints
- Flow-thru valves
- Glue
You will need to cut the PVC pipe to fit between the parts, and then make the connections as shown below.
To install your overlap liner follow the directions that came in your liner box, use the directions below as a reference.
Use the directions that come in your liner box and in your pool instructions, use the instructions below as a reference.
If you are using a unibead liner, these liners can be hooked on the wall or you can remove the J portion on the top of the liner and then feed the bead that is on the liner into the bead receiver. We do not sell bead receivers. Also, if you are installing a replacment liner make sure your bead receiver is in good condition or the liner could slip out when the water is added.
When your liner is installed, you need to fill the pool with 1-2 feet of water before cutting installing your skimmer and return. In addtion you do not want to cut the hole in the liner until the skimmer plate and backside are installed and you cut on the inside of the skimmer.
Once your pool is filled for the first time or you finish adding water when you open your pool in the spring, you can take a water sample to a local pool store and get them to test your water and tell you what you need to add or you can use the test kit that was provided to determine what needs to be added before you start your chemical maintenance program. All water should be checked and balanced before any chlorine or salt is added.
You will need a closing chemical kit and a winter cover.
SANDSTONE ABOVE GROUND SWIMMING POOL
KEYWEST ABOVE GROUND SWIMMING POOL
PARADISE ABOVE GROUND SWIMMING POOL
DIAMOND STAR ABOVE GROUND SWIMMING POOL
SWIMMING POOL INSTALLATION INSTRUCTIONS
Installation Videos
OVAL installation video
ROUND installation video
Pre-assembly for TRADITIONAL BUTTRESS supports
Pre-assembly for BUTTRESS-FREE supports


